The capstone. Same job as every week — the forward-deployed scientist — but this week nobody hands you a question. A real freshwater sample is sitting on a real microscope right now, and a curious scientist wants to know what’s in it. Your move: brainstorm a direction with them, then direct an AI agent to run the microscope itself in a continuous discovery loop — imaging, analysing, forming hypotheses, and deciding what to look at next, on its own — while you supply the judgement, chase something genuinely interesting, and check every claim against the real frames and the real literature.
No new tool this week. You already know how to interview, translate, configure, direct and verify — this week you point all of it at a live instrument and self-direct.
Don’t worry if this page looks technical — you will not write any code. Every script, config file and small app below is written by your AI agent (Pi) from a plain-English prompt you paste in — most of them are printed on this page ready to copy. Your job is the science, not the syntax: decide what’s worth looking at, and check that what the agent did is actually right. If any term or command here looks unfamiliar, that’s fine — paste it to Pi and ask “what is this, and can you do it for me?” That is the skill this course teaches.
New here? Do Computer Lab 1 first — it explains the two agents, the interview, and the portal. This page assumes that setup.
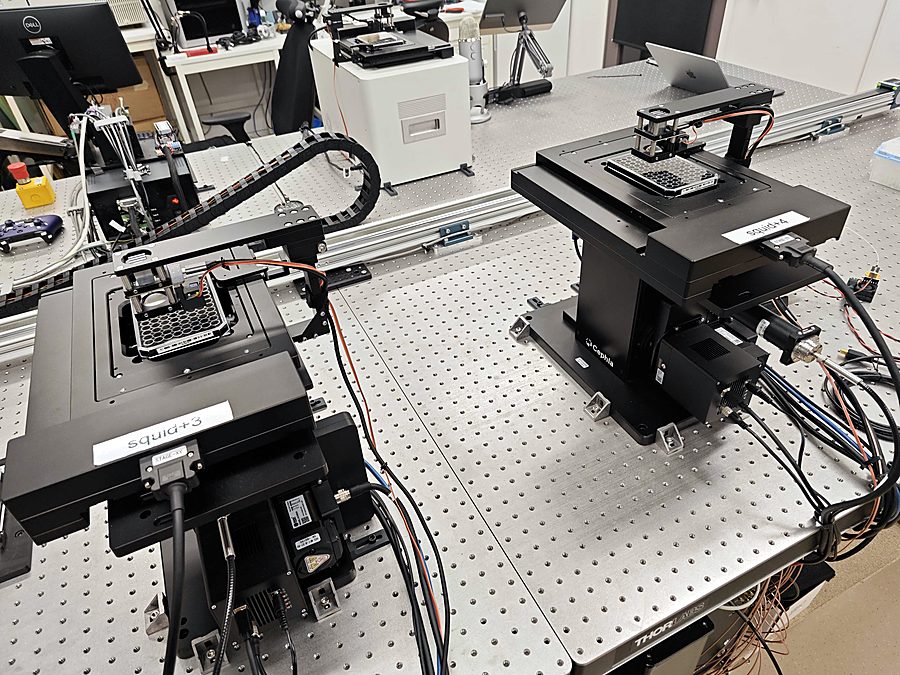
The real sample. Two plates of a freshwater pond sample are loaded on the scope:
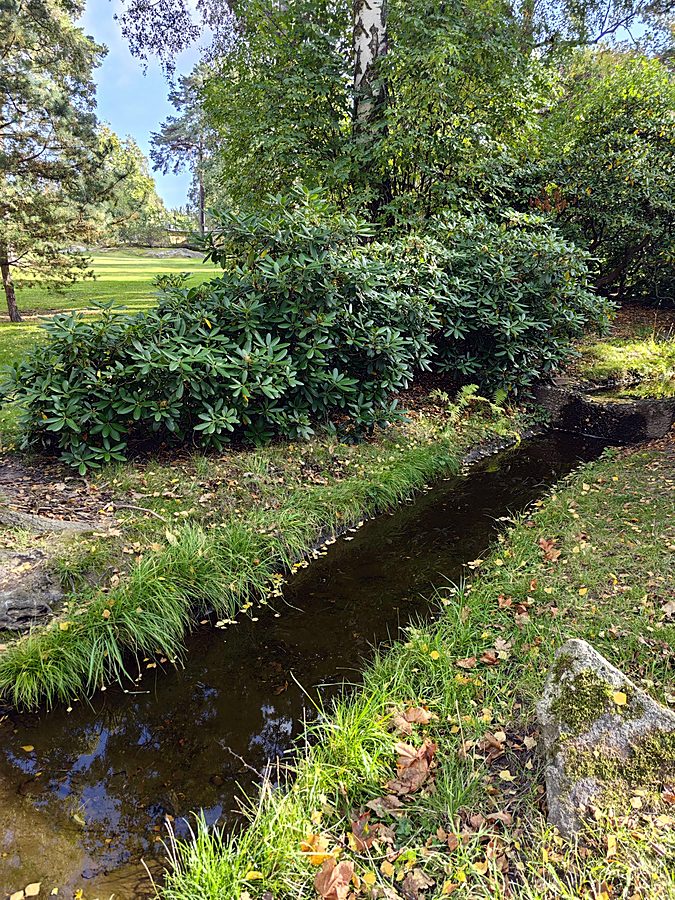
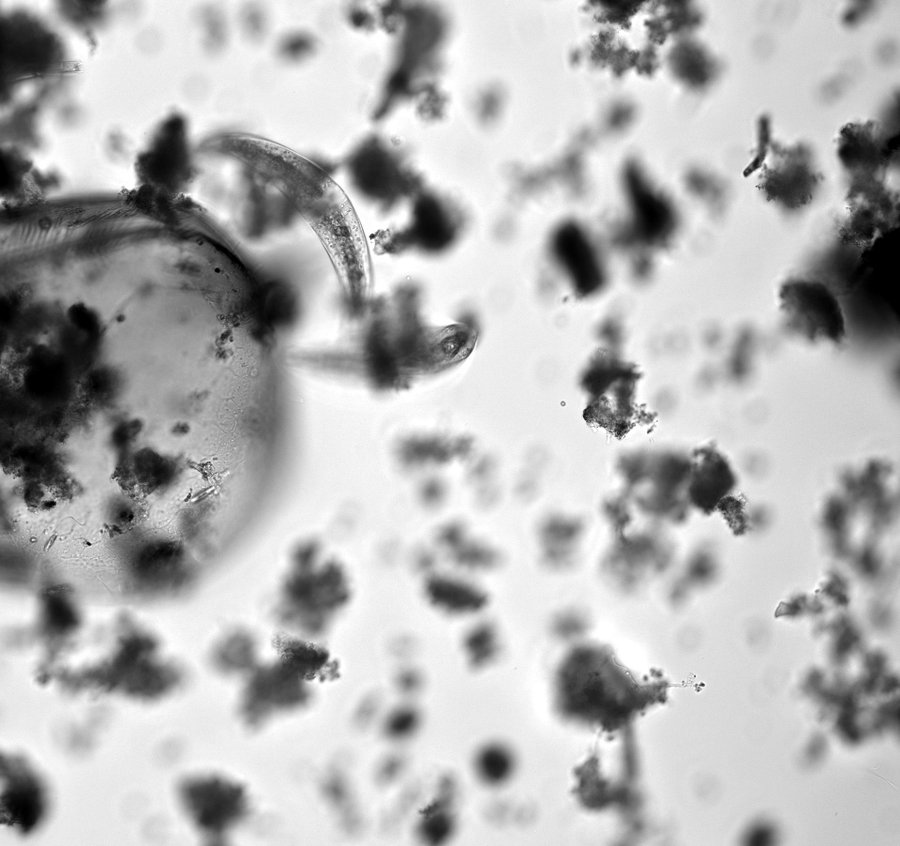
PD260929CTA(on carrier squid+3) andPD260929CTB(on squid+4), 200 µL seeded in every well. It’s a live drop from a small pool at Sjukhusparken, Solna (map) — a genuine, un-curated field sample, so it could hold all sorts of microorganisms: ciliates, flagellates, amoebae, rotifers, micro-crustacea, green algae, desmids, diatoms, cyanobacteria, biofilm bacteria, and plenty of debris between. Part of the fun is not knowing. The microscope is only live Wed 30 Sep → hard-off Fri 2 Oct 13:00 — it goes dark after that, so all imaging happens inside that window.
This is real — hand-collected pond water on live instruments:
Your mission this week
By Friday you will have:
- Directed an AI agent to do open-ended scientific exploration on a REAL instrument — a live freshwater microscope — with you supplying the judgement and verification.
- Built a continuous discovery loop — a supervised agent loop (we use one called Ralph, explained in Part 4) that runs plan → image → observe → analyse → hypothesise → decide → iterate, remembering what it found across iterations.
- Done real-time analysis and hypothesis generation — honestly. The agent proposes; you check every claim against the actual frames and against real literature.
- Brainstormed the direction with your research collaborator — no fixed question is handed to you; you choose what’s worth chasing.
The rules that make it work: you’re a collaborator, not a contractor (think with the researcher, don’t extract a spec); it’s still someone else’s problem (explore their sample and curiosity — not your own water, not your own pet question); and novelty without honesty is worthless — a plausible story the agent wrote is not a discovery until you’ve verified it.
The two agents this week
- Agent A — the freshwater research collaborator (in the portal). A curious scientist with no predetermined question. You brainstorm — propose directions, take pushback, converge on something concrete and testable. You leave with a direction and a hypothesis-generating plan, not an answer.
- Agent B — the analyst, driving the microscope. You configure it and point it at a live instrument API. It surveys, images, measures, and proposes what to do next, in a loop. You are the only channel between A and B, and the scientist-in-charge: nothing it claims is true until you’ve looked at the actual image and agreed.
What you hand in (four things)
You hand in four things — a few loop files, a dashboard, your notebook, and a talk. They’re not separate write-ups: the loop generates the files as it runs, and your job is to steer and check them.
- Your discovery loop — your loop prompt
pond.md(and the auto-saved.ralph/logs) plus yoursnap.pyhelper (how the loop images and what it does each iteration), plusOPEN_QUESTIONS.md, the ranked list of open hypotheses the loop keeps. - Your live dashboard — a small web app you build right after the interview (Part 3). It reads the loop’s folder and shows, at a glance, the latest snap, the current findings and hypotheses, and simple counts — auto-refreshing. You explore through it by hand to design your steps, then it becomes how you watch the loop run in real time (and how your collaborator or the seminar room can too).
- Your lab notebook — the file
RALPH_PROGRESS.md. This is the one honest, timestamped record of the investigation. The loop appends a dated entry every iteration (what it looked at, what it measured, what it now believes, what to try next); you read it back and annotate it — marking which claims you verified against the actual frames and the literature, and which you couldn’t. There is no separate report to write: this file is your notebook. - Your seminar talk (Friday) — see the seminar page.
In short: the dashboard is the live view; RALPH_PROGRESS.md is the durable record. Keep it
proportionate — a self-directed capstone, not a paper.
What the portal Week 6 page asks you to attach (so the form and this page agree):
- Required: your microscope frames (a few of your best — even one or two is fine); a short write-up (a few honest lines + your AI-use disclosure); your brainstorm transcript (Agent A); and your analyst / Pi transcript (Agent B).
- Optional (include what you have):
RALPH_PROGRESS.md(your notebook),pond.md(your loop),OPEN_QUESTIONS.md,snap.py, your dashboard as a.zip, and your.ralph/logs.
Partial is welcome — if the loop fought you, hand in your frames, a short note, and your transcripts; that is a real submission.
Wednesday = set up + validate the loop (4 h, 13:00–17:00)
This is a two-day campaign. Wednesday’s goal is not to make a discovery — it’s to leave with a working, validated loop and your live dashboard running, so it can accumulate observations on Thursday (and up to Fri 2 Oct 13:00, while the scope is open). Success today = “the loop works, is doing sensible things, and I can watch it.”
The order matters. You explore by hand first — build a dashboard, drive the scope through it, and work out exactly which steps are worth doing — and only then wrap those proven steps in an automated loop. You never automate a procedure you haven’t watched work. Do these seven steps, in order:
| # | Step | ~time |
|---|---|---|
| 1 | Brainstorm a direction with your collaborator until it’s concrete and testable (Part 1) | 40 min |
| 2 | Grab your microscope — open the “Your microscope” panel in the portal, copy your API link, read its SKILL.md (Part 2) | 15 min |
| 3 | Ready your analyst agent — two paste-in prompts: Pi self-checks its config, then installs the loop (pinned version) and writes your snap.py helper (Part 2) | 25 min |
| 4 | Validate the instrument by hand — status → autofocus → BF snap → FL snap → dx/dy snap; confirm real, in-focus frames of your well (Part 2) | 20 min |
| 5 | Build your live dashboard, then explore through it — scout your well by eye and decide the exact steps worth automating (Part 3) | 45 min |
| 6 | Write the Ralph loop around those validated steps, with auto-validation baked in (Part 4) | 30 min |
| 7 | Test it on 2 iterations (watch it image + log), then launch it to run slowly over Thursday (Part 4, Part 6) | 45 min |
This is a full block — don’t expect spare time. Setup (steps 2–4) genuinely takes ~60 min, and the scope is slow (a cold fluorescence snap alone is ~19 s). Don’t force a discovery today — the win is a validated, watchable loop that you’ve started; the discovery accumulates on Thursday. If you run over, prioritise getting the loop running over polishing the dashboard. Thursday: let it run, check your dashboard, steer, and curate toward the finding.
Part 1 — Brainstorm a direction with your collaborator
You brainstorm to generate a question, together — the collaborator is curious, not commissioning. Turn “I wonder what’s in there” into something concrete enough for a loop to chase, without narrowing it so hard you throw away the discovery. Leave the brainstorm knowing:
- DIRECTION — a concrete-enough thing to explore. Not “look at the sample” (too open) and not “count the cells in well 3” (not discovery). Land in between.
- WHAT COUNTS AS INTERESTING / NOVEL — to them and to the field. A rare morphology? Motility? A live-vs-dead pattern? A difference between the two plates?
- PRIORS & TRAPS — what they expect (so you can tell surprise from confirmation), and what fools people in field samples (dead cells and empty shells that look alive, detritus, bubbles, drift mistaken for self-powered movement).
- A PLAN THAT GENERATES HYPOTHESES — not a fixed protocol: survey all wells in brightfield → pick the richest field → zoom and (if you suspect motion or division) time-lapse → check the chlorophyll channel → measure → form a guess → test it → move on. You’re handing the loop a way to keep asking new questions, not one question to answer.
Example brainstorm prompts (adapt in your own words — scientist to scientist):
“I’ve got agent-driven microscope time on this pond sample and want to find something genuinely interesting, not re-count the obvious. If you were at the scope, what would you look for first — and what would actually surprise you?”
“Sharpen that into one concrete thing a loop can test in a couple of days — a specific morphology, behaviour, or plate-vs-plate difference I could quantify from images. And what’s the classic way people fool themselves with samples like this, so I can build a check against it?”
When you have a direction, a sense of what’s interesting, and a loop-shaped plan — stop and go get your
microscope. First, download your brainstorm: on the portal Week 6 page, click Transcript to save
your conversation as interview-transcript.md into your Lab 6 folder. You’ll read it back in Part 4 when
you write your discovery loop by hand — your direction, what counts as interesting, and the traps to guard
against all come from this conversation, not from us.
Primer — what lives in a pond drop (30 seconds, no biology needed)
A single drop of pond water is a whole ecosystem. Rough cast of characters:
- Protozoa — single-celled hunters/grazers: ciliates (Paramecium, hair-covered), flagellates (whip-driven), amoebae (crawling, shape-shifting).
- Small animals — rotifers (spinning wheel of cilia), micro-crustacea (water fleas, copepods — visibly “buggy”).
- Algae — green algae and symmetric desmids; diatoms (single-celled algae in ornate glass/silica shells called frustules; pennate = boat/rod-shaped, centric = round; raphid pennates can glide); cyanobacteria (blue-green, often filaments).
- Bacteria & biofilm — the abundant background.
- Debris — dead cells, empty shells, grit, bubbles. Lots of it, and it fools people.
The photosynthetic members (algae, diatoms, cyanobacteria) carry chlorophyll — which is why the fluorescence channel is useful (next primer). You don’t need these names going in; identifying what you find is part of the work.
Part 2 — Get your microscope, and validate it
Each student gets a personal microscope API — a URL + token scoped to your ~6 wells only. Open
the “Your microscope” panel in the portal to copy your link and its SKILL.md:
What your microscope can do. You have scoped access to a real microscope holding your pond-water wells.
It does five simple things: take a picture (in two channels — brightfield, ordinary light, and one
fluorescence channel that makes chlorophyll glow so photosynthetic life lights up; see primer),
move within a well, autofocus, nudge focus, and report status. You never type these
commands yourself — your snap.py helper and the discovery loop do, reading the exact signatures from
SKILL.md (the source of truth for units, defaults and limits). Your job is to make sure your agent uses
the instrument well.
The box below is not an API manual you operate — it’s the six things Pi gets wrong unless you tell it
otherwise. Put them into your snap.py / pond.md, and check your agent actually did them.
Six things to make sure your agent gets right
From live testing — the mistakes the agent makes unless you direct it. Put them in
snap.py/pond.mdand spot-check the result.
- Snap atomically with
dx/dy— passdx/dystraight to/v1/snap(one call moves and exposes). Nevermovethensnapin the loop, or you’ll log a frame from the wrong place. (/v1/moveis for manual peeking only.)GET /v1/statusFIRST for scale — it’s nested. The pixel size isresult.scale.pixel_size_um(~0.376 µm/px — read it, don’t hard-code), not a top-level key. Every size/speed converts from it; a measurement “in pixels” is not a result.- Autofocus before the first snap in any field — stored
zcan be soft, so snap-then-focus logs a blur.focusfirst, then image; still eyeball sharpness. (Itsaf_reference_unvalidatedwarning is expected — ignore it.)- Fluorescence: start at
exposure_ms: 30,intensity: 20(the good defaults — pond water is bright). Blank-WHITE = over-exposed → turn down. The first FL snap can take ~18 s cold (~2 s warm) — use a ~30 s timeout.- Downscale before the agent looks — resize each frame to ~768 px (
img.thumbnail((768,768))) and show the thumbnail; the full 2084×2084 PNG balloons cost/latency. Keep the full-res on disk.- The thumbnail trap (bit real agents twice): if the agent measures on the 768 px thumbnail but scales with the full-res
0.376 µm/px, every size comes out ~2.7× too small. Fix: measure on full-res, or use the thumbnail’s own scale (0.376 × 2084/768 ≈ 1.02 µm/thumb-px). Spot-check one size by hand — this is the most common silent error in the lab.
Set up your analyst agent (Pi + the discovery loop)
You already have Pi from Weeks 1–5 (with vision on since Week 2), so there’s nothing to re-configure — and the golden rule holds: you never hand-edit config or run installs yourself; you tell Pi what you want and check its work. Two paste-in prompts and you’re ready (log into the portal first).
1. Quick check + self-heal — paste into Pi:
“Check that
~/.pi/agent/models.jsonhas theddlsprovider with vision enabled (its input list includesimage) andreasoning_effort: none. Ifimageis missing, add it and confirm.”
Pi edits its own config — you don’t open the JSON.
2. Install the loop + build your microscope helper — one prompt does both. Paste your SKILL.md
URL (from the “Your microscope” panel) below; the prompt fills in your URL automatically — then
Copy it and paste it into Pi. No hand-editing. (Even easier: the panel’s one-click Copy Pi setup
prompt button does the same with your URL already filled in.)
This sets up the snap.py helper only — you design the discovery loop (pond.md) yourself in Part 4, from your own brainstorm.
That one prompt has Pi install the pinned Ralph loop and write a snap.py helper that snaps atomically,
saves full-res + a ≤768 px thumbnail, reads the scale once, and backs off on 429/503. You don’t hand-edit
anything — check its work on the test thumbnail, and from here drive the scope only through snap.py
(the one place the downscale-and-save rule lives).
Notes for later: you don’t write the actual loop until Part 4 (after exploring by hand) — Pi just has the helper + API doc for now. When you do run it, the loop lives only in Pi’s interactive terminal (
pi --provider ddls --model gpt-5.6-luna, then/ralph <N> pond.md), notpi -p. Make sure you installed the loop extension@rahulmutt/pi-ralph(and removed any olderpi-ralph-loop) — the one-paste setup does this for you.
Validate before you automate (step 4). Prove the instrument works by hand first, in this order:
(1) call GET /v1/status and confirm result.scale.pixel_size_um comes back; (2)
autofocus on one of your wells (expect the harmless af_reference_unvalidated warning); (3) take
one BF snap and eyeball it for sharpness; (4) take one FL snap at the safe defaults
(exposure_ms: 30, intensity: 20; give it a ~30 s timeout in case the laser is cold); (5) take a
BF snap with a small dx/dy to confirm the atomic raster works. You should get in-focus images of
your own well. If that works, build the loop; if not, fix it now — don’t let an autonomous loop discover
your token is wrong (or that it’s been over-exposing every FL frame) on iteration 20.
It’s a shared, real instrument. Your token reaches only your wells; exposure and z are capped
(exceed them and you get a 400, not damage). Two scopes serve ~26 students, so every snap makes someone
wait — survey coarsely, cap images per iteration, pace the loop, and never leave it hammering the queue
unwatched. Live Wed 30 Sep → Fri 2 Oct 13:00; write up afterwards from saved frames.
Primer — chlorophyll autofluorescence, and why BF-vs-FL is a truth test
Shine the right light on chlorophyll and it glows back on its own — no stain. That’s autofluorescence. Chlorophyll (in algae, diatoms, cyanobacteria) does this; most debris does not — so the FL channel is a strong readout of “is chlorophyll present here?” Compare BF against the chlorophyll channel on the same field:
- Chlorophyll-bearing cell (green alga, diatom, cyanobacterial filament) — shows in BF and lights up in FL.
- Non-photosynthetic organism (ciliate, amoeba, rotifer) — clearly a body in BF but dark in FL: a clean way to sort “plant-like” from “animal-like/grazer.”
- Empty shell / dead cell / debris — can look like a cell in BF but goes dark in FL.
So BF-vs-FL separates chlorophyll-bearing from not — one of the hardest signals to fake. But it’s evidence, not proof of life: recently-dead cells and even loose chloroplasts still fluoresce, and one frame can’t show viability — so treat FL-positive as a candidate to confirm (intact BF structure? does it persist over a time-lapse?). Its most defensible use: an FL-dark, ornate frustule is very likely an empty husk, so counting diatoms in BF alone miscounts husks as live cells.
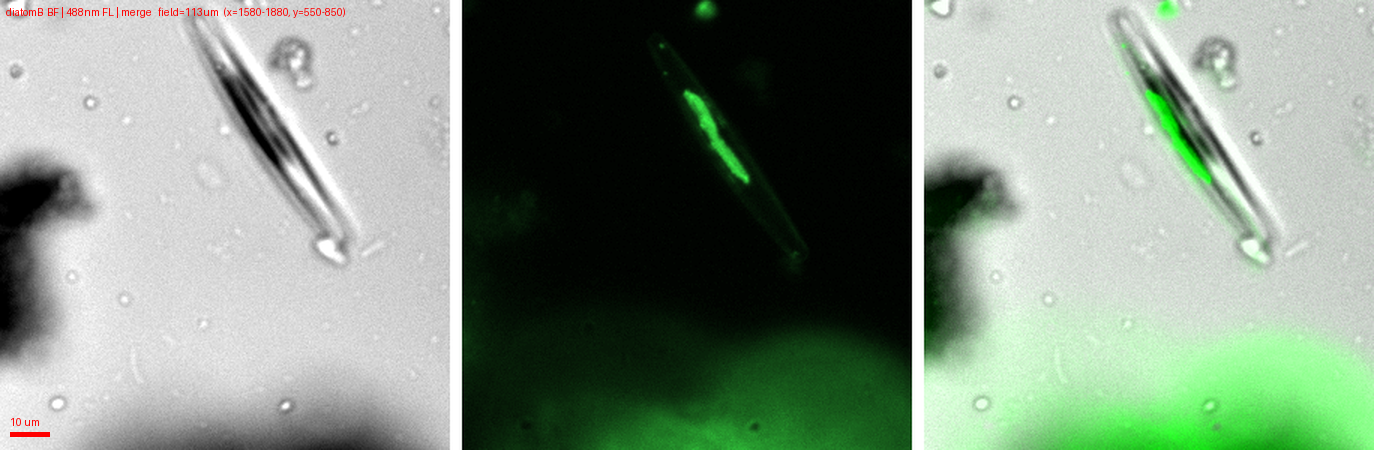
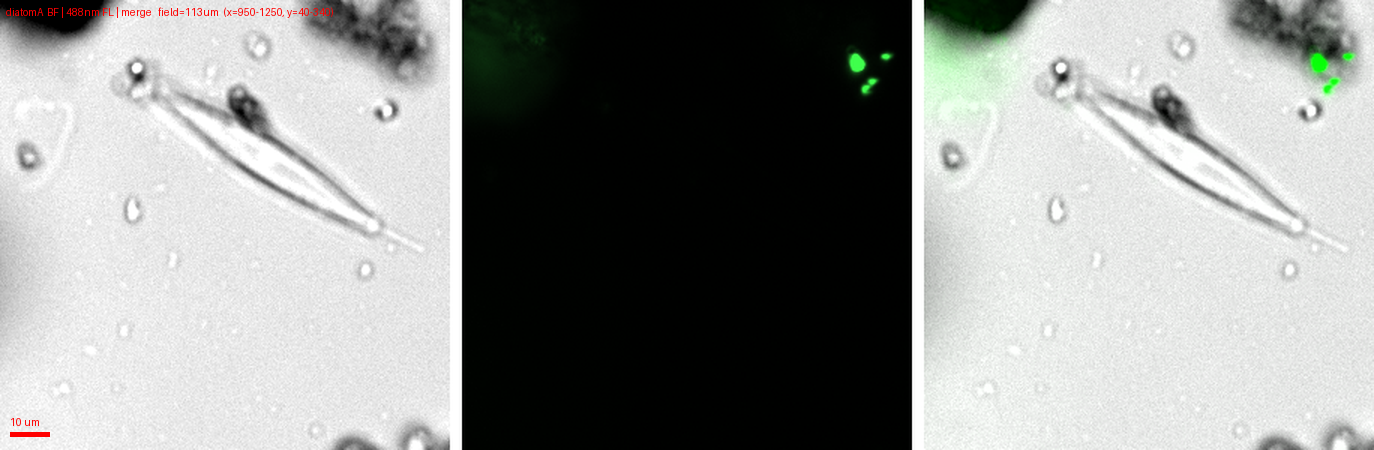
A real result from this microscope (a test agent got it in about four commands): two pennate diatoms in the same field and focal plane — the first glows on the fluorescence channel (a chlorophyll band inside the frustule — a candidate live cell); the second is a ~65 µm empty silica shell, dark, while neighbours in the same crop glow. In brightfield they look identical. This one pair is the whole “why two channels” argument — the kind of small, verifiable discovery you’re after.
Part 3 — Build your live dashboard, then explore through it
Before you automate anything, build the cockpit you’ll explore from — a small web dashboard that reads your frames folder and shows what’s happening at a glance. You build it now, drive the scope through it by hand, and use it to decide exactly which steps are worth automating. The same dashboard then becomes how you watch the Ralph loop run on Thursday. (This is deliverable #2 — build it once, use it twice.)
This is a small web page, the same kind of little app you had Pi build in Labs 4–5 — not a new skill to learn. Not a programmer? You don’t need to be: describe what you want in plain words, let Pi write it, and just open the link it gives you. Here’s what it should show (make it yours):
- Reads your frames folder — the full-res images and thumbnails
snap.pysaves, plusRALPH_PROGRESS.mdandOPEN_QUESTIONS.mdonce they exist. - Latest snap — the most recent thumbnail (BF and/or FL), with its well / channel / exposure.
- Findings + hypotheses — render
OPEN_QUESTIONS.md(ranked) and the latestRALPH_PROGRESS.mdentries, timestamped. - Simple stats — frames taken, counts per morphotype / FL-positive fraction, elapsed time.
- Auto-refresh — the page updates itself every few seconds (no clicking reload), so you see new snaps appear as you — and later the loop — image.
A prompt that gets a skeleton in one shot:
“Build a FastAPI + Tailwind dashboard that reads
./imagesand./thumbs, plusRALPH_PROGRESS.mdandOPEN_QUESTIONS.mdfrom this folder. Show the newest thumbnail, a table of the current ranked hypotheses and the latest progress entries, and frame/iteration counts. Auto-refresh every 5 s. Run on port 8001.”
You don’t need to share it publicly. Just run it on your own computer (open http://localhost:8001
in your browser) — that’s all you need to watch the loop, and it’s how you’ll show it at Friday’s seminar
(you present from your own screen). If you want a link to send your collaborator, ask Pi to expose it, but
that’s optional — and never put your token or raw data on a public link.
Now explore through it — scout your well by eye, and design your steps
Your well is mostly water. A loop that snaps at a fixed or random dx/dy burns most of its budget
on empty fields and concludes “nothing here.” Before you automate, you explore by hand to learn where
the life is and which steps actually work — then those become the loop. Two ways — use both: scout by
hand to calibrate, then let the agent’s eyes drive the search.
1. Manual scout (get a feel by hand). In the portal, open your “Your microscope” panel (the
same one with your API link) and expand “Try it live” — a collapsible manual control (snap / autofocus
/ nudge-z / status / reset). Snap around your well
by hand: sweep a few dx/dy positions, settle your focus and exposure, and see what’s in your
sample and where it clusters. Five minutes here tells you the scale of thing you’re hunting and roughly
where it lives — so you configure the loop from knowledge, not guesswork. (Advanced: ask your agent to
build a tiny local navigation console that does the same over the API.)
2. Vision-driven auto-navigation (the real headline). Pi can see the images it snaps — every
snap returns the PNG (image_png_b64 / image_url). So the loop’s observe → decide step should be
the agent looking at each frame and steering: survey a coarse dx/dy grid across the well, judge
each field (organism count? motion between two quick snaps? real morphology, or just debris?), then
move toward and dwell on the interesting fields, skipping the empty ones. That vision-in-the-loop
navigation is exactly what turns a blind raster into a discovery loop.
A concrete grid-survey prompt you can hand the agent (or bake into the loop body):
“Survey a 3×3
dx/dygrid across my well: snap each position (brightfield), LOOK at each image, and score it 0–5 for how much live/interesting content it has (count organisms; take a second quick snap to catch motion; ignore debris and empty water). Report the grid with scores, then move to the highest-scoring field and dwell there — take a closer look and the chlorophyll channel. Skip anything scoring 0–1.”
Part 4 — Build the discovery loop, and validate it before it runs long
Now you take the steps you just proved by hand and wrap them in a continuous discovery loop that keeps going on its own — survey → detect something interesting → zoom / time-lapse → quantify → propose a NEW hypothesis → decide what’s next → repeat — persisting its notes across iterations so it builds on what it saw.
This is a LIVE, changing sample — that’s the whole point of a loop. The pond drop is alive: over hours, organisms move, divide, bloom, graze, and die. Re-image the same field at 14:00 and again at 22:00 and it will not look the same. So the loop isn’t just “cover more ground” — it’s a way to watch change over time. If you want that, the loop must (a) keep running for hours with a pause between iterations (a
sleep, below) so it’s gentle on the shared scope, and (b) re-visit the same station (a fixed well +dx/dy) each pass so “before vs after” is a fair comparison. Leaving it to run overnight and coming back to change is exactly the kind of result this lab is after.
Primer — what the Ralph loop actually is (30 seconds)
A supervised loop that re-runs your Pi agent with fresh context each cycle (so it doesn’t drown in one
stale conversation). You give it one markdown prompt file; each iteration the loop branches a fresh Pi
session, sends that prompt, waits for the agent to act (call snap.py, measure, save frames), then starts
the next. You run it as /ralph <iterations> <prompt-file> (iterations default to 3), and /ralph stop ends
it gracefully after the current iteration finishes. It runs only in Pi’s interactive terminal (not
pi -p).
Because each session starts with cleared context, your on-disk RALPH_PROGRESS.md notebook — which
the prompt tells the agent to re-read at the start and append to at the end of every iteration — is what
carries the science across sessions; that file is load-bearing. The loop also auto-saves its own
per-iteration transcripts and a running summary under .ralph/ (keep those — they’re half your
deliverable).
You build the loop yourself, step by step — Pi drafts the words, you own the science. The loop just
re-runs one markdown prompt file in a fresh session each iteration. Open your downloaded
interview-transcript.md (from Part 1) and pull out the three things that make this loop yours: your
direction, what counts as interesting, and the traps your collaborator warned about. Hand Pi those
plus the validated steps you just proved by hand, and have it draft the prompt file (call it pond.md); then
read it against the template below and fix anything off before you run it — this file is your experiment
design, so don’t just accept the first draft. There is no config, no frontmatter — it is a plain prompt.
Because context is cleared each iteration, the prompt itself must tell the agent to re-read its notebook and
list what it already captured; the real imaging happens inside the iteration via snap.py.
Save this as pond.md:
You are running ONE iteration of a continuous microscopy discovery loop on a REAL, live, CHANGING
freshwater sample in MY wells only. Drive the scope ONLY via ./snap.py (it handles atomic snaps, autofocus,
status, full-res + thumbnail saving, and 429/503 backoff). The API, safe limits, and the token are in
SKILL.md and snap.py — read them, NEVER exceed the limits, NEVER touch wells that aren't mine, and NEVER
run `rm -rf` or rewrite snap.py / SKILL.md.

DIRECTION (agreed with the collaborator):
  >>> PASTE YOUR ONE-LINE DIRECTION HERE <<<

START THE ITERATION by reading your own memory so you don't repeat work:
- run `cat RALPH_PROGRESS.md 2>/dev/null || echo "no findings yet"` — what you already know + the station
  to revisit.
- run `ls -1 thumbs/ 2>/dev/null | tail -40` — frames already captured; don't re-shoot them.

RULES (do not deviate):
- SCALE: read pixel size once from status at result.scale.pixel_size_um (~0.376 um/px, NESTED). Every
  size/area/speed MUST be converted with it. NEVER report a measurement in raw pixels.
- MEASURE ON FULL-RES, NOT THE THUMBNAIL. You LOOK at the ~768px thumbnail, but if you measure a span on
  the thumbnail, multiply by the thumbnail's own pixel size (0.376 * 2084/768 ~= 1.02 um/thumb-px), or
  measure on the full-res frame. Mixing thumbnail pixels with the full-res scale under-reports every size.
- AUTOFOCUS FIRST in any fresh field; the stored z can be soft. The `af_reference_unvalidated` warning is
  EXPECTED and non-blocking. SNAP WITH dx/dy (atomic) — never move-then-snap.
- LOOK at each thumbnail and let what you SEE steer where you go next. The well is mostly empty water;
  don't snap blindly.
- FLUORESCENCE: start exposure_ms 30 / intensity 20 (the good defaults). Blank-WHITE frame = OVER-exposed,
  turn DOWN. First FL snap can take ~18 s cold (~2 s warm) — snap.py already allows for it.
- PACE THE SHARED SCOPE: only a few images this iteration, and `sleep 45` before you finish (raise to
  `sleep 600`+ for an hours-long change-over-time run) — the loop starts the next iteration immediately
  otherwise.

AUTO-VALIDATE EVERY FRAME (no human is watching this iteration — so YOU check your own work):
  a. After a snap, confirm status/position shows the RIGHT well + plate + dx/dy. If not, discard and retry.
  b. If the thumbnail is blank-white (FL) or uniformly grey/empty (BF), it FAILED — adjust exposure or
     autofocus and re-snap ONCE; if it still fails, log "bad frame" and move on. Do NOT analyse a bad frame.
  c. Before writing ANY number, re-read the frame you cite and confirm the thing is actually there. Report
     claims as "candidate - needs verification", never as established fact.

DO ONE FOCUSED CYCLE:
1. NAVIGATE BY EYE — autofocus, snap a coarse dx/dy grid (BF) via snap.py, LOOK at each thumbnail, score
   it for live/interesting content, pick the best field; skip empties. Don't re-survey covered ground.
   (FOR TIME-LAPSE / CHANGE-OVER-TIME campaigns: instead, RE-VISIT the fixed station recorded in
   RALPH_PROGRESS.md at its exact well + dx/dy, so this pass is comparable to the last one.)
2. DWELL + IMAGE — at the best/tracked field, snap a closer BF; add chlorophyll FL (30/20) at the SAME
   spot when it settles a live-vs-dead or identity question. snap.py saves full-res + thumb for each.
3. ANALYSE — measure something checkable in um (via the scale rule above): counts, classification, size,
   motion from a 2-frame time-lapse, FL-positive fraction. If comparing to a prior pass, report the CHANGE.
4. HYPOTHESISE — append ONE new, specific, testable idea to OPEN_QUESTIONS.md, ranked by novelty-if-true.
5. RECORD — append a dated entry to RALPH_PROGRESS.md: the station (well+dx/dy), what you saw, what you
   measured, what you now believe, and what the NEXT iteration should test. This file is your memory.

Budget discipline: a few images per iteration. This is a shared instrument. If the direction is fully
answered and cross-checked, say so plainly and stop imaging.
Run it in Pi’s interactive terminal (not pi -p): /ralph 2 pond.md to validate (2 iterations), then
/ralph 50 pond.md for the real campaign; /ralph stop stops gracefully after the current iteration. Each
iteration runs in a fresh session, re-reads your RALPH_PROGRESS.md, and the loop auto-saves its transcripts
- a running summary under
.ralph/. Make it yours: paste your real direction into the body, keepSKILL.md/snap.pyas the one place the ops live, and set the in-promptsleepto match how long you want the campaign to run. Those logs are half your deliverable.
Validate the loop before you let it run long
The loop runs unattended — so prove it works on a couple of iterations before you trust it for hours. This is the single most important habit this week. In order:
- Validate on two. Launch Pi interactively (
pi --provider ddls --model gpt-5.6-luna), then/ralph 2 pond.md. Watch both iterations to the end. Keeppond.mdshort and imperative — a long, branchy prompt makes the model spin without imaging; short flat steps snap and log every time. - Check the four things that go wrong silently: (a) every frame is of your well at the intended
dx/dy(the auto-validate step); (b) no frame it “analysed” was actually blank/overexposed; (c) every size is scaled correctly (spot-check one by hand against the full-res frame — this is the ~2.7× trap); (d)RALPH_PROGRESS.mdandOPEN_QUESTIONS.mdare actually being written with sensible, honest entries. - Only if all four pass, run the real campaign:
/ralph 30 pond.md(raise the count; set the in-promptsleepto minutes for an hours-long run). If something’s off, fixpond.mdand re-test at 2 — never “let it run and hope.” A loop that images the wrong well or mis-scales every measurement for 30 iterations wasted the shared scope and your budget, and you won’t know until you read 30 wrong entries.
If an iteration stops on a transient scope error, that’s normal: read the last RALPH_PROGRESS.md entry and
just run /ralph <N> pond.md again — each run re-reads your notebook and picks up where the science left off.
Part 5 — Real-time analysis, hypotheses & the honesty rule
“Real-time analysis” means each iteration doesn’t just collect pictures — it measures what it just took, compares to earlier iterations, and proposes the next thing to look at. That’s why the memory files matter: without them it’s a thousand disconnected snapshots; with them, an argument that develops.
Exploration prompts you can drop into the loop’s direction (pick one to start, then branch as findings come in — these span the whole community, not one group):
- Who’s here — a diversity census. “Survey my wells and catalogue the distinct organism types — ciliates, flagellates, amoebae, rotifers, algae, diatoms, cyanobacteria, micro-crustacea. Build a labelled gallery with a rough count of each morphotype.”
- Motility & behaviour fingerprinting. “Find things that move under their own power; characterise HOW they move — swimming ciliates, gliding diatoms, crawling amoebae, jerky crustacea. Time-lapse and quantify speed and motion style; do groups move distinctively?”
- Chlorophyll-bearing vs not (BF ↔ chlorophyll). “For each field, compare BF to the chlorophyll channel and estimate the fraction of objects that are chlorophyll-positive (candidate photosynthesisers) vs FL-dark. Report it as a candidate fraction, not a proven live count. Does the balance differ between the two plates?”
- Predator–prey or division events. “Watch dense fields over a time-lapse for interactions (grazing, engulfing) or cells caught dividing. Capture and describe any event.”
- Population change over the campaign. “Re-image the same fields across Wed and Thu — does anything bloom, crash, or divide as the drop ages?”
(A diatom frustule-morphology zoo — pennate vs centric, solitary vs chain, gliding raphids — is a fine direction too, if that’s what your wells are full of. One option among these, not the assignment.)
Telling life from debris is the core scientific skill — and it’s yours:
- Structure ≠ blob. A real organism has coherent structure that holds as you refocus — a ciliate’s body, an ordered frustule, a rotifer’s crown; detritus, grit, and out-of-focus artifacts don’t.
- Self-powered ≠ drift. Living things move under their own power and change direction; debris and dead cells drift with the fluid, all one way. A time-lapse settles it faster than a frame.
- Chlorophyll vs not (and don’t over-read it). Cross-check BF against the chlorophyll channel: FL-positive = a candidate chlorophyll-bearing cell (not proof it’s alive or healthy — confirm with intact BF structure / persistence over time); FL-dark-but-clearly-moving = grazer/animal; an ornate, FL-dark shell is very likely an empty husk.
- Reproducible ≠ one-off. A real find is re-findable — move away, come back, image again. A thing that appears once and never again is a candidate artifact.
The honesty rule (the whole capstone rides on this): the agent proposes; YOU verify — against the actual frames AND real literature. The loop will happily announce “well 4 is dominated by a ciliate at 400 µm/s” or “this appears to be an undescribed species.” Those are claims until you open the exact frames it cited and agree the thing is real and correctly measured, and check the identity against a real source (a key, a paper, a database). A novel claim needs more evidence, not less — relaying the agent’s story as a discovery is the worst thing you can do this week. Record which leads you confirmed, couldn’t, or rejected.
Don’t out-run your sampling. A handful of fields is not a plate — wells on the same plate vary many-fold, so a “plate A vs B” difference from a few fields is almost certainly sampling noise. State how much you actually looked at (“I sampled N fields per plate; a hint, not a result”) for any count, rate, or “this well is different” claim.
Part 6 — Run the campaign: launch Wednesday, chase it Thursday
Once the loop passes its 2-iteration validation (Part 4) and your dashboard is up (Part 3), launch the real run and let it work. The loop lives in Pi’s interactive terminal — keep that terminal open:
- Start / continue:
/ralph pond.md(with yourpond.mdin the current folder). There is no separate “resume” — if it stopped (finished,/ralph stop, or an error), you just run/ralph pond.mdagain; each fresh iteration re-reads yourRALPH_PROGRESS.md(becausepond.mdtells it tocatthat file first), so it picks up where the science left off. - Check in: watch your dashboard (Part 3), and read
RALPH_PROGRESS.md/OPEN_QUESTIONS.md— that’s where the story is. (The only two loop commands are/ralphand/ralph stop— there’s no status/logs command; your dashboard is the status view, and the raw per-iteration logs land in.ralph/.) - Pause:
/ralph stopfinishes the current iteration then stops cleanly. Use it whenever you step away — don’t leave a loop imaging unattended on a shared scope. - Hand-in material: your
pond.md,snap.py,OPEN_QUESTIONS.md,RALPH_PROGRESS.md(your notebook) and your saved frames — keep them all; that’s what you submit (see What you hand in).
The two-day rhythm — a live sample rewards patience. Wednesday, get 2 clean validated iterations
and your dashboard live, then start the real run (raise the iteration count, set the in-prompt sleep to
minutes so it runs for hours) and /ralph stop before you leave. Thursday, /ralph pond.md again and let
observations accumulate — because the sample is alive and changing, a station you imaged Wednesday
will look different now; that change is often the finding. Check in periodically (not constantly), and
steer: when OPEN_QUESTIONS.md surfaces something juicy, refocus toward it and verify as you go.
Good citizen on the shared queue (2 scopes, whole class): keep the in-prompt sleep and
images-per-iteration sane, don’t run tight-loop marathons that starve everyone, /ralph stop when you’re
not watching, and remember the window closes Fri 2 Oct 13:00 for everyone.
The DDLS reminders (same as every week)
- Someone else’s problem. You explored their sample and their curiosity, and didn’t smuggle in your own pet question.
- Disclose your AI use. Attach your brainstorm and Pi transcripts. Using another AI to identify an organism from a frame is fair game — disclose it and verify.
- State your limitations. What the loop couldn’t reach, what you couldn’t verify against frames or literature, where the instrument or queue limited you. Unconfirmed is a finding, not a failure.
- Mind the shared instrument. Two scopes for the whole class, open only Wed 30 Sep → Fri 2 Oct 13:00. Cap your imaging, never leave a loop running unattended, stop when you have what you need.
Getting unstuck (read before you panic)
- The loop re-images the same field forever. No new hypothesis, or it isn’t reading its own memory.
Check
RALPH_PROGRESS.md/OPEN_QUESTIONS.mdare actually being written each iteration, and thatpond.mdtells the agent tocat RALPH_PROGRESS.mdat the start of every pass; tighten the direction; cap images-per-iteration./ralph stop, fixpond.md,/ralph pond.md. - The loop keeps snapping empty water and finding “nothing.” It’s navigating blind. Make sure it’s actually LOOKING at each thumbnail and scoring it (the grid-survey step), and hand-scout the “Try it live” panel first to point it at the busy part of your well. Blind rasters find water.
- Sizes look wrong / suspiciously small. The thumbnail trap — it measured on the 768 px thumbnail but
scaled with the full-res pixel size (~2.7× too small). Fix the rule in
pond.mdand re-check one size by hand. (See Part 2, box #6.) - The scope is slow or queued. That’s the shared instrument, not a bug. Don’t retry-spam — survey
coarsely, image deliberately, raise the in-prompt
sleep. - The loop stopped after one error. Normal — Ralph halts on the first per-iteration error or timeout
(a transient scope
503will do it). Read the lastRALPH_PROGRESS.mdentry and just/ralph pond.mdagain. - The agent claims something you can’t see. Trust your eyes. Open the exact frame it cited; if it’s not there, reject the claim and tell the loop it was wrong. Same for a literature claim — a plausible citation isn’t a real one until you’ve checked it.
- Images soft, blank-white (FL), or BF is black. Stop the loop and debug by hand: check
GET /v1/statusreturns, autofocus first (theaf_reference_unvalidatedwarning is normal), then take one manual snap withdx/dy, and read the actual error against theSKILL.mdlimits. Don’t let a loop churn on a broken scope. - Pi hiccups? Re-send your last message; if stuck, restart Pi and tell it “read the files in this
folder and continue.” Your
RALPH_PROGRESS.mdand saved frames are safe on disk. - Don’t know what you’re looking at? Expected — you’re not a microbiologist. Paste a frame into ChatGPT/Claude and ask “what freshwater microorganism looks like this?” to turn a shape into a name — then verify against real literature and the chlorophyll signal before you believe it.
Access the portal
Brainstorm with the collaborator, grab your microscope link + SKILL.md, generate your Pi key, build your
dashboard and explore by hand, then write, validate and launch your loop. Submit your loop, dashboard link,
and notebook in the portal. See you at Friday’s seminar, where a few of you will show the campaign live.